Hey guys, I am back with my next blog on "Understanding the Visual Studio 2015 IDE". I hope till now you must have procured necessary things with Visual Studio 2015. And my job for now is to uncover things for you to make it easier to understand. So lets start now. !!
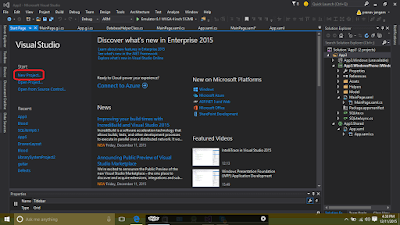
After successful installation of all the required features click on the VS2015 file to open it. The following window will be displayed :

After getting the "START PAGE" click on NEW PROJECT as shown above or else you can also select it from the FILE menu and the following window will appear :
The above displayed window will show you all the options available in Visual Studio for application development. Select any of those platforms to start with the development process. Once you are done with opting the platform you will see the following window :
The development environment is divided into 3 main parts namely : Design View, Code View, Solution Explorer. Design view will have your actual virtual device layout on which you will do the designing part. The Code view includes the code of whatever you have designed onto the Design view. The Solution Explorer includes all the files, references, and sub projects you have included in your main project.
The main functional coding is done at the backend page. By expanding the .xaml page you will see the .cs page which includes all the functional code as shown below :
Visual Studio 2015 along with SQL database provides extensions for SQLite, cloud services like Microsoft Azure for database connectivity and data storage. For this extra functionality you have to download all the required extensions. For downloading them click Tools > Extensions and Updates
as shown below :
The extensions are provided with brief descriptions on the right side. You can also search for extensions online. Download all the required extensions for your application from EXTENSIONS & UPDATES. Once you are done add the reference of the new extension in Solution Explorer right click References > Add Reference.
You are almost done with the basic needs to start with application development now. To add cross platforms to you project right click Solution > Add > New Project > Select the platform you want to add (i.e., Android, Windows, iOS) as shown below :
Once done with this process you will see the projects which are created into the Solution Explorer. Here I have created a Universal Windows app (Desktop and Windows phone 8.1) and iOS app as shown below :
The left side of the IDE gives you Toolbox and Server Explorer. The Server Explorer is integrated with database tools like Microsoft Azure. You need to log in to your Microsoft account to get access to the services.
The IDE also includes Output and Error window. The Output Window displays all the step by step processes your app undergoes from building stage till its deployment stage as shown below :
The Error window shows errors, warnings, and messages as shown below :
* Important : For testing the application on your devices directly rather than opting for emulators you need to TURN ON the "Developers Mode" on your devices. We will have a look at it in the next blog.
Here comes the end of Understanding the IDE of Visual Studio 2015. For now its enough of being informative and its time to change the phase to the exciting world of coding. In the next blog I'll first start with Universal Windows App development from the basics and then step by step we will move towards the other platforms. Stay put DEVELOPERS!!!
Suggestions and advices are always welcomed ;).
Thank you.


nyc job pranav...very useful
ReplyDelete