Monday, 28 December 2015

Chap.3 - Cross Platform App Development

         HELLO FRIENDS!!
    In this blog we will start with a basic app (auto-increment a number on click event) for Android and Windows. For simplification a video is attached at the end of this tutorial.
   
    Before starting with the coding part make sure you have installed Xamarin and all the required files for Android development. For installation of the files refer Chap.1 - Installation and once you are done with installing all the required files you are ready to go.

    Lets START !!

> Open Visual Studio.

> Click File -> New -> Project -> Android -> Blank App

> Right Click Solution in Solution Explorer -> Add Project ->Windows ->Universal/Windows phone 

    Now application files are created for both Android and Windows.
   
    Android :

> Click Resources -> layout -> Main.axml
> Click Design

    You will get the following window :


    > Click Source

    You will get the following window :


    > Double Click MainActivity.cs file from Solution Explorer to open the file.
   
    Write the following code :

   
    You are almost done with Android part.

    Now for building and debugging Android app select Startup App as your Android app. Select the emulator on which you want to test the app and hit the button RUN.


    WINDOWS PHONE :

> Click MainPage.xaml file

    You will get the following window :


> Double Click on the button you will be navigated to the MainPage.xaml.cs file with button_click() method auto generated.

> Write the following code inside button_Click () method :


    You are almost done with Windows part.

    Now for building and debugging Windows Phone app select Startup App as your Windows Phone app. Select the emulator on which you want to test the app and hit the button RUN.


    VIDEO TUTORIAL OF CROSS PLATFORM APP DEVELOPMENT (AUTO INCREMENT NUMBER ON BUTTON CLICK) :

Click to view :


Friday, 11 December 2015

Chap. 2- Understanding the IDE

   
    Hey guys, I am back with my next blog on "Understanding the Visual Studio 2015 IDE". I hope till now you must have procured necessary things with Visual Studio 2015. And my job for now is to uncover things for you to make it easier to understand. So lets start now. !!

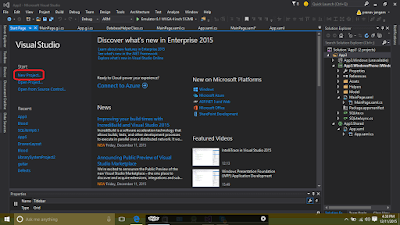
    After successful installation of all the required features click on the VS2015 file to open it. The following window will be displayed :


    If you haven't installed the setup yet, go through Chap -1. Installation link and you will get a detailed description on installation  process.

    After getting the "START PAGE" click on NEW PROJECT as shown above or else you can also select it from the FILE menu and the following window will appear :


    The above displayed window will show you all the options available in Visual Studio for application development. Select any of those platforms to start with the development process. Once you are done with opting the platform you will see the following window :


    The development environment is divided into 3 main parts namely : Design View, Code View, Solution Explorer. Design view will have your actual virtual device layout on which you will do the designing part. The Code view includes the code of whatever you have designed onto the Design view. The Solution Explorer includes all the files, references, and sub projects you have included in your main project.

    The main functional coding is done at the backend page. By expanding the .xaml page you will see the .cs page which includes all the functional code as shown below :


    Visual Studio 2015 along with SQL database provides extensions for SQLite, cloud services like Microsoft Azure for database connectivity and data storage. For this extra functionality you have to download all the required extensions. For downloading them click Tools > Extensions and Updates
as shown below :


    The extensions are provided with brief descriptions on the right side. You can also search for extensions online. Download all the required extensions for your application from EXTENSIONS & UPDATES. Once you are done add the reference of the new extension in Solution Explorer right click References > Add Reference.

    You are almost done with the basic needs to start with application development now. To add cross platforms to you project right click Solution > Add > New Project > Select the platform you want to add (i.e., Android, Windows, iOS) as shown below :


    Once done with this process you will see the projects which are created into the Solution Explorer. Here I have created a Universal Windows app (Desktop and Windows phone 8.1) and iOS app as shown below :


    The left side of the IDE gives you Toolbox and Server Explorer. The Server Explorer is integrated with database tools like Microsoft Azure. You need to log in to your Microsoft account to get access to the services.


    The IDE also includes Output and Error window. The Output Window displays all the step by step processes your app undergoes from building stage till its deployment stage as shown below :


    The Error window shows errors, warnings, and messages as shown below :


    * Important : For testing the application on your devices directly rather than opting for emulators you need to TURN ON the "Developers Mode" on your devices. We will have a look at it in the next blog.

     Here comes the end of Understanding the IDE of Visual Studio 2015. For now its enough of being informative and its time to change the phase to the exciting world of coding. In the next blog I'll first start with Universal Windows App development from the basics and then step by step we will move towards the other platforms. Stay put DEVELOPERS!!!


Suggestions and advices are always welcomed ;).
Thank you.


Saturday, 5 December 2015

Chap.1 - Installation

   
    So, I am back as promised earlier. First of all thanks a lot for all of your responses to the blog. I am glad that I am getting a huge support.
    Firstly, lets start with the installation process of Visual Studio 2015. There are many options available in Visual Studio 2015. One is you can download Visual Studio Community IDE or can also opt for Visual Studio Enterprise.
    Download any of the product from the aforementioned links and lets start with the step by step installation process of Visual Studio 2015. Before the installation of Visual Studio 2015 make sure the "Virtualization" is enabled from BIOS settings as follows:


    Enable and Disable the following :


    After doing this save and exit and then start the system. Once it is done click on the setup file you have.
                        Select "Typical" to install all the necessary components.
     However if you want specific components and tools to be installed, choose "Custom"

    For users who already have Visual Studio installed on their system they need to click the setup file and choose"Modify" as follows :
   
 
    After clicking the "Modify" button following options will appear :

    For Universal Windows App Development following features needs to be installed :
  •  Tools and Windows 10 SDK.
  • Emulator for Windows 10.
    You can also download separate Windows 8.0/8.1 tools and emulator.
    For Cross Platform Development following features needs to be installed :
  • C#/.NET (Xamarin)[3rd party]
  • HTML/JavaScript (Apache Cordova)
  • Visual C++ Mobile Development (It includes Visual C++ for both Android and iOS Development )
  • Java SE Development Kit.
  • Android SDK
  • Android Native Development Kit.
The packages that were selected will be downloaded and installed the setup process is finished, click on "LAUNCH" and now you are good to go.

** Note : The installation might take some time depending on your internet speed and the speed of your system. Have some patience. Because its worth waiting for a while.**


The installation process is done here. And now in the next blog we will understand the IDE of Visual Studio 2015. I'll be back soon.
Thank You.


Tuesday, 1 December 2015

Brief description of Visual Studio 2015


Microsoft Visual Studio has always illustrated the thinking of Microsoft and their commitments towards enhancement and development.

      I am a Visual Studio user from last 5 years and have seen the developments in every new version of Visual Studio. Started learning C# 5 years ago and people used to give advice's not to go for C# rather learn some core languages. And currently we can see that C# is booming in the market and all thanks to Microsoft Visual Studio and its development.

      I'll give a brief description about the new Microsoft Visual Studio 2015 and then we will start with the development part. So starting with the traditional features Microsoft Visual Studio 2015 can develop web based and desktop based apps with C#,C++ languages and in addition to this you will find tooling for modern platforms with Python, Node.js, Cross Platform Mobile Support with Cordova and Xamarin.
 

    Yeah, you can develop applications for any platform(i.e. Android, Windows, iOS) and with ease. Adding the third-party Xamarin tools to Visual Studio 2015 allows us to develop apps for many devices. Xamarin and Cordova tools in Visual Studio 2015 have tapered the mind-numbing task of same application development for all individual platforms. The work is reduced by providing a portable option of sharing the code throughout the project. Much of the code remains same for all the platforms which is again a mind blowing thing as the job is reduced and much of the time is saved.
   
    Android and iOS emulators are added to Visual Studio 2015 which provides you with the exact look and feel of android and iOS devices so that you can test your apps on that emulators and see how it will work on actual android and iOS devices.


    It doesn't end here. Microsoft Visual Studio 2015 has added support for Microsoft Azure which enables the developers to add cloud services to the applications. Microservices and APIs are key elements in building scalable cloud applications. NuGet client tools are added to produce and consume packages. Silverlight support is extended for creating engaging, interactive user experiences for mobile applications. For database support there are all the necessary tools provided which you can download it under the tools tab. We will learn how to use it in detail later.

    There's a lot like this in the new Visual Studio 2015. And after walking through the changes in the IDE we can say that Microsoft is trying to push developers to come forward and contribute in the new era of development of modern mobile applications with cloud support and cross-platform development. If Visual Studio continues to show it's advancements then I must say that it will surely create interest and will be a fun to program.

I've written this blog because there are lot many people who are still unaware of the technological advancement and still following the traditional way of coding and developing applications. Its an attempt to make them aware of what they can do and how much time they can save if they adopt the new way of coding technology. And I hope, this will mould and produce lot many developers in our community.

*** We will begin with the coding sessions in the next blog ***